实践Git

介绍

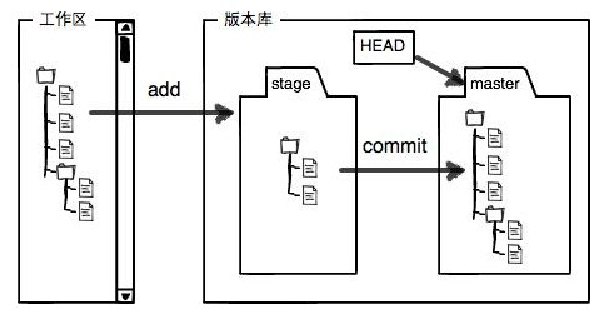
workspace

安装

源码编译安装

1
2
# 依赖
$ sudo yum install -y openssl-devel curl-devel expat-devel zlib-devel gettext-devel perl-devel
1
2
3
4
# 编译(非root)
$ make prefix=/usr/local all
# 编译且安装(需要root)
$ make prefix=/usr/local install

package manager

debian

1
$ sudo yum install -y git

GUI客户端

git客户端众多,可以根据需要选择安装。以下主要介绍两个,一个是windows资源管理器模式使用的,一个是Eclipse开发使用的。

  • windows客户端

先安装Git for Windows(下载戳此处)。

再安装tortoisegit(下载戳此处)。

注意:避免Windows和Unix换行符不同而引起比对差异问题(详见GitHub 第一坑:换行符自动转换),建议安装Git for Windows过程中,选择Checkout-as-is, commit as-is,参见下图:
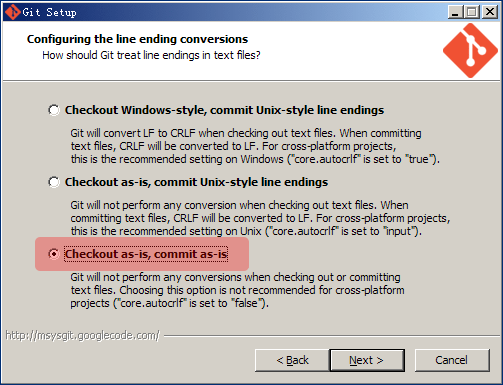
Git-AutoCrlf

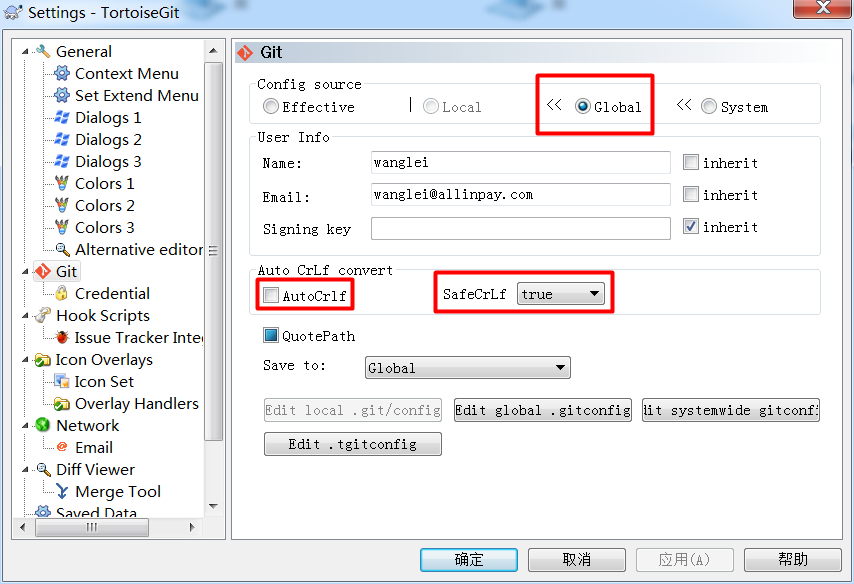
也可以后面通过TortoiseGit的settings中设置,参见下图: Tortoise-AutoCrlf

命令行下修改,参见如下:

1
2
$ git config --global core.autocrlf false
$ git config --global core.safecrlf true

且统一换行符为Unix换行符,参见实践Eclipse

安装完成后把Git for Windows的git加入到环境变量path中,命令行验证git安装是否成功。

1
2
C:\Users\Ray>git --version
git version 1.9.4.msysgit.0
  • Eclispe某些版本一般自带有git插件(EGit),避免麻烦,建议直接选择集成EGit的Eclipse

  • 其他客户端可选,比如SourceTree,更多可以参考Git图形化界面客户端大汇总

备注:git项目访问url一般有两种,ssh和http,如果选择http,则使用账号访问,如果使用ssh,则使用密钥访问,密钥配置方法详见下面的3和4。

TortoiseGit密钥配置

  • 运行TortoiseGit开始菜单中的Puttygen程序

  • 点击“Generate”按钮,鼠标在上图的空白地方来回移动直到进度条完毕,就会自动生一个随机的key

  • 将多行文本框中以“ssh-rsa”开头的内容全选、复制,并粘贴到gitlab的Settings -> SSH Keys -> Add SSH key -> Key字段中,这就是适用于gitlab的公钥

  • 在Puttygen中,点击“Save private key”按钮,将生成的key保存为适用于TortoiseGit的私钥(扩展名为.ppk)(TortoiseGit使用的私钥是这个,妥善保存)

  • 点击菜单Conversions-》Export OpenSSH Key,保存为文件,比如openssh

Eclipse密钥配置

  • 点击window—preference—Team—Git—-Configuration,在user settings栏目点击Add Entry,分别添加user.name和user.email两个Entry,对应gitlab的用户名和邮箱。
  • 点击window—preference—General—Network Connections–SSH2,选择Key Management,点击Load Existing Key…,导入上面导出的OpenSSH Key,然后点击Save Private Key…到个人用户目录的.ssh目录下,比如我的放在C:\Users\Ray\.ssh,默认保存文件名为id_rsa(Eclipse命令行使用的私钥是这个,妥善保存),默认即可。

ssh-keygen密钥配置

1
$ ssh-keygen

验证

1
2
3
$ ssh -T git@192.168.70.244
# 查看详细信息
$ ssh -T -v git@192.168.70.244

配置user.emai和user.name

1
2
$ git config --global user.email "123456@qq.com"
$ git config --global user.name "zhangsan"

使用

init

初始化仓库

1
$ git init

status

1
$ git status

add

添加(新文件或修改)到暂存区(stage或index)

1
2
3
$ git add <filename>
# 添加全部
$ git add --all

commit

从暂存提交至版本库

1
$ git commit -m "<comment>"

将修改跳过暂存直接提交至版本库

1
$ git commit -a -m "<comment>"

checkout

1
2
# 撤销对工作区的修改
$ git checkout --<filename>

rm

1
2
# 撤销暂存(新文件)
$ git rm --cached <filename>

ignore

.gitignore

1
2
3
4
5
6
7
8
9
10
11
12
13
14
15
16
17
18
19
20
21
22
23
24
25
26
27
28
29
30
31
32
33
34
35
36
.classpath
.project
.settings/
target/
.idea/
*.iml
.vscode

/vendor/*
!/vendor/vendor.json

/target/
!.mvn/wrapper/maven-wrapper.jar

### STS ###
.apt_generated
.classpath
.factorypath
.project
.settings
.springBeans
.sts4-cache

### IntelliJ IDEA ###
.idea
*.iws
*.iml
*.ipr

### NetBeans ###
/nbproject/private/
/build/
/nbbuild/
/dist/
/nbdist/
/.nb-gradle/

reset

1
2
3
4
5
6
7
8
# 撤销暂存(修改)
$ git reset HEAD <filename>
# 回退最后一个提交(将HEAD指向前一个提交)
$ git reset --hard HEAD^
# 回退最后两个提交(将HEAD指向前二个提交)
$ git reset --hard HEAD^^
# 回退到指定的commit
$ git reset --hard <commit-id>

revert

1
2
# 回退某个commit
$ git revert -n commit-id

diff

1
2
3
4
5
6
7
8
9
10
# 比较工作区与暂存区
$ git diff
# 比较暂存区与最新本地版本库
$ git diff --cached  [<path>...]
# 比较工作区与最新本地版本库
$ git diff HEAD [<path>...]
# 比较工作区与指定commit-id的差异
$ git diff commit-id [<path>...]
# 比较两个commit-id之间的差异
$ git diff [<commit-id>] [<commit-id>]

help

1
2
3
4
5
6
7
8
9
10
11
12
13
14
15
--ignore-cr-at-eol
Ignore carriage-return at the end of line when doing a comparison.

--ignore-space-at-eol
Ignore changes in whitespace at EOL.

-b, --ignore-space-change
Ignore changes in amount of whitespace. This ignores whitespace at line end, and considers all other sequences of one or more
whitespace characters to be equivalent.

-w, --ignore-all-space
Ignore whitespace when comparing lines. This ignores differences even if one line has whitespace where the other line has none.

--ignore-blank-lines
Ignore changes whose lines are all blank.

patch

将差异生成为patch

1
$ git diff > <patch name>

应用patch前检查patch是否有冲突

1
2
# 没有任何输出则表明可以顺利接受补丁
$ git apply --check <patch name>

应用patch

1
$ git apply <patch name>

能打的补丁先打上,有冲突的会生成.rej文件,此时可以找到这些文件进行手动打补丁

1
$ git apply --reject patch

log

show commit logs

reflog

show reference logs,当reset后又想去到未来时,可以通过reflog查到commit id

branch
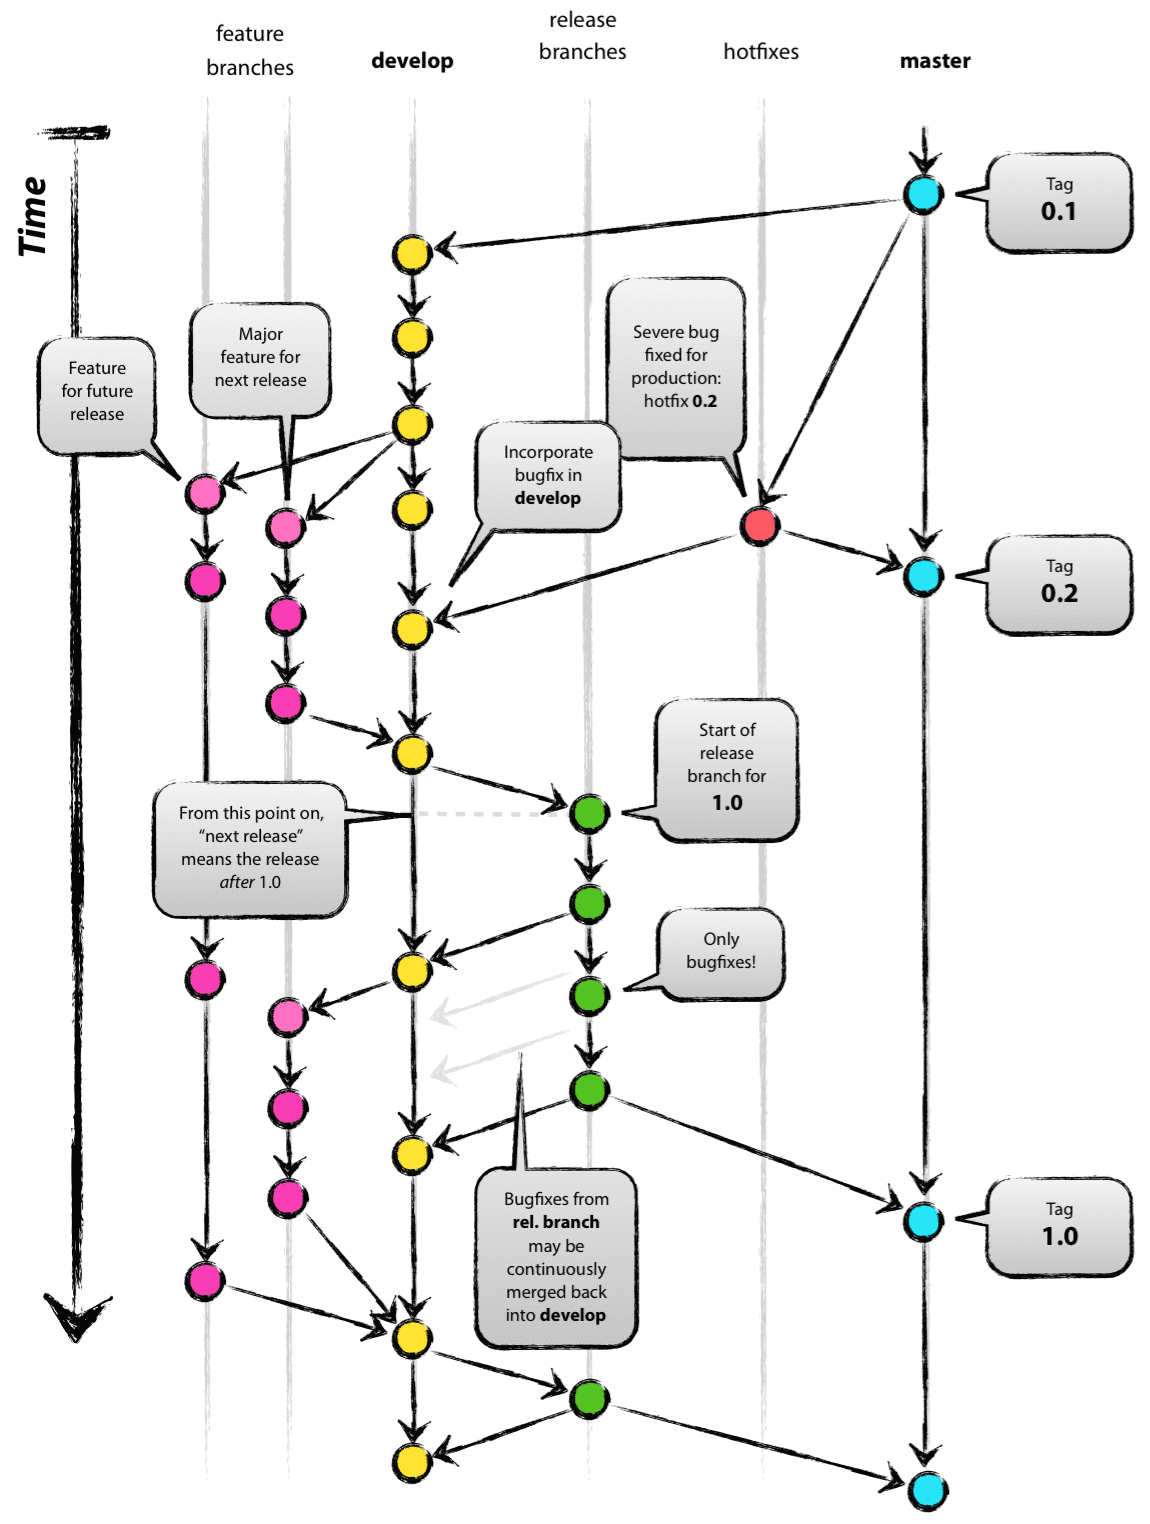
git分支模型

1
2
3
4
5
6
7
8
9
10
11
12
13
14
15
16
17
18
# 查看本地分支
$ git branch
# 查看远程分支
$ git branch -r
# 创建分支(默认基于当前分支,也可以指定起点)
$ git branch <new branch name> [<old branch name>|<tag name>|<commit>]
# 切换分支,如果branch name在本地不存在,但是在远程存在同名分支,则等价于git checkout -b test origin/test
$ git checkout <branch name>
# 创建并切换分支(默认基于当前分支,也可以指定起点)
git checkout -b <new branch name> [<old branch name>|<tag name>|<commit>]
# 基于远程分支创建并切换分支,并且跟远程分支关联
git checkout -b test origin/test
# 删除分支
git branch -d <branch name>
# 强制删除分支(比如当分支未被合并时)
git branch -D <branch name>
# 创建本地分支和远程分支的连接关系
$ git branch --set-upstream <branch name> origin/<branch name>

tag

1
$ git tag -d commons-api-1.0.0

remote

添加本地的远程仓库,比如origin(自己的远程仓库)和upstream(fork的源远程仓库)等

1
2
3
4
# 添加仓库
$ git remote add <remote> <url>
# 删除仓库
$ git remote remove <remote>

远程仓库地址

1
2
3
4
# 修改远程仓库地址
$ git remote set-url origin <仓库地址>
# 添加远程仓库地址(push),这样一次push就能够推送到多一个远程仓库
$ git remote set-url --add origin <仓库地址>

添加远程仓库地址后的效果:

1
2
3
4
$ git remote -v
origin	git@github.com:Wang-Ray/Wang-Ray.github.io.git (fetch)
origin	git@github.com:Wang-Ray/Wang-Ray.github.io.git (push)
origin	git@gitee.com:Ray-WANG/Ray-WANG.git (push)

clone

1
2
# 会自动添加origin远程仓库
$ git clone <url>

push

推送到远程仓库

1
2
3
4
5
# 首次将本地master分支推送到远程并建立关联
$ git push -u origin master
# 首次将本地V2分支推到远程并建立关联
$ git push --set-upstream origin V2
# -u和--set-upstream等价
1
2
3
4
5
6
7
# 非首次
$ git push origin
# 或【只有唯一的远程仓库】
$ git push

# 强制push
$ git push -f origin develop

fetch

仅拉取远程仓库到本地的远程仓库(比如origin或upstream仓库),不会合并到本地工作空间或本地仓库

1
$ git fetch <remote>

pull

拉取远程仓库到本地并合并到本地工作空间,相当于git fetch + git merge,首次也需要进行分支关联。

1
2
3
$ git pull <remote>
# 当遇到:fatal:拒绝合并无关的历史
$ git pull --allow-unrelated-histories
1
2
# 相当于git fetch + git rebase,从远程仓库拉取最新的内容并被嫁接到本地工作空间
$ git pull --rebase
1
2
3
$ git config pull.rebase false  # merge
$ git config pull.rebase true   # rebase
$ git config pull.ff only       # fast-forward only

merge

将某个分支的变化合并进来,一般用于下面两种情况,一个是将成熟功能分支合并到主干分支,另一个是避免功能分支避免落后主干分支太多,不定期将主干分支合并到开发中的功能分支。

通常,合并分支时,如果可能,Git会用“fast forward”模式,但这种模式下,删除分支后,会丢掉分支信息。如果要强制禁用“Fast forward”模式,Git就会在merge时生成一个新的commit,这样,从分支历史上就可以看出分支信息。

1
2
3
# 合并某分支到当前分支(fast forward)
$ git merge -m "<comment>" <branch name>
$ git merge -m "<comment>" <remote>/<branch name>
1
2
3
# 合并某分支到当前分支(no fast forward)
$ git merge --no-ff -m "<comment>" <branch name>
$ git merge --no-ff -m "<comment>" <remote>/<branch name>

冲突样例:

1
$ git merge feature1

冲突文件示例如下:

1
2
3
4
5
<<<<<<< HEAD
行业应用管控台
=======
## 平台简介
>>>>>>> feature1

rebase

顾名思义,就是重新定义(re)起点(base)的作用,也就是说把当前分支的根基换一下的意思,有点像嫁接。

1
2
# 当前分支嫁接到指定分支
$ git rebase <branch name>

stash

Q&A

git没有完整安装

1
2
3
$ git clone https://github.com/AngiWANG/sample-spring-javaconfig.git
正克隆到 'sample-spring-javaconfig'...
fatal: Unable to find remote helper for 'https'

由于git没有完整安装导致,重新完整安装即可解决。

Linux和Windows双系统引起权限被修改

1
2
3
4
$ git diff
diff --git a/pom.xml b/pom.xml
old mode 100644
new mode 100755

由于Linux和Windows双系统,文件权限被修改,可以通过配置git,忽略文件模式,例如:

1
$ git config --global core.filemode false

中文路径和文件名

git的中文支持已经非常好了,但是默认设置下,中文路径和文件名在工作区状态输出,查看历史更改概要,以及在补丁文件中,中文不能正确地显示,而是显示为八进制的字符编码,示例如下:

1
2
3
4
$ git status -s
?? "505764463016.txt\n
$ printf "505764463016.txt\n"
说明.txt

参考如下配置即可:

1
$ git config --global core.quotepath false

参考:Git的中文支持

unsafe reporitory

1
2
3
4
5
$ git status
fatal: unsafe repository ('/media/ray/resource/workspace/practice/Wang-Ray.github.io' is owned by someone else)
To add an exception for this directory, call:

	git config --global --add safe.directory /media/ray/resource/workspace/practice/Wang-Ray.github.io
1
2
3
git config --global --add safe.directory /media/ray/resource/workspace/practice/Wang-Ray.github.io

git config --global --add safe.directory *